Pages

Showing posts with label recipes. Show all posts

Monday, February 21, 2011

Weekend randomness

Yes, a double-posting today! Lucky you! ;-P

I had a 3-day weekend with Salem and got to do some relaxing, shopping, got a few things done and now I feel rested. :-)

We ended up going to Mom's last night with the hopes of doing laundry but the power was out. Salem and I ended up picking up some thai food and all 3 of us ate by the candle light (with a fire roaring in the fireplace). It was actually fun and Mom exclaimed her disappointment when the power came back on as soon as we were done having supper. Although I must admit that the timing was perfect - we were otherwise coffee-less. We even got to play Tock and Skip-Bo.

This weekend, I tried out another food experiment. I had eaten too many carbs the night before and was trying to do some damage control. Solution: a low-carb, high-protein version of a crêpe with filling and fruit coulis. Here goes!

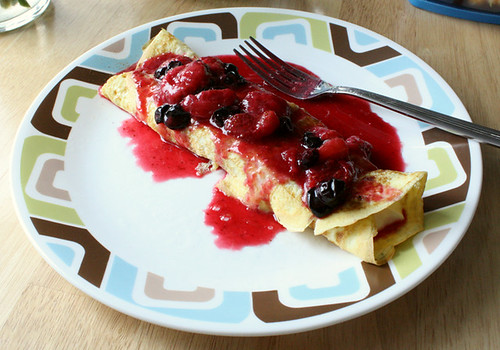
Caro's damage-control stuffed crêpe with berry coulis


"Crêpe"
1 egg
1/4 cup egg whites
A dash of vanilla extract
A sprinkling on Splenda

Simply mix all ingredients, throw into a non-stick pan on medium heat and slip over once it starts browning.

Filling
1/2 cup 0% Greek yogurt
a wee-bit of vanilla extract
A bit of Splenda (if you so wish)

Simply mix.

Coulis
A few berries (I took some fresh blueberries and strawberries I had lying around) - I took about 1/3 cup total
1 Tbspn water

Throw this into a small microwaveable dish and nuke for about 1 minute.

Assembly:Put the "crêpe" on a plate, place your Greek yogurt mix in the centre of your "crêpe", fold the edges over to the centre and top with your fruit coulis. Enjoy!!!!


And now for something completely random!

A beauty-mark on Salem's foot along with my added scribbling. PS I did it in permanent marker!!! Bwahahahaha!

Wednesday, December 1, 2010

Quick and healthy snack - am I losing the little sanity I have left?

Well, I just wanted to make a quick post about the snack I just tested out on myself:

0% greek yogurt (130g) a  +   1/2 scoop of mango peach Breezer protein powder

Makes for a very orangey looking yogurt. How did it taste? Not bad but I think I will be putting maybe 1/3 of a scoop next time and maybe actually put in a bit of real fruit (my mind is still searching for the missing fruit). I must admit though that it wouldn't be for everyone. Picture to come soon.

Currently stuck in my head: Daft Punk's Harder Better Faster Stronger. I could at least dance to it if I were at the studio but my current desk is too visible - I rather my co-workers not look at me oddly just yet. 

Friday, July 30, 2010

A strange, high-protein breakfast experiment


So last night I started brainstorming about a possible breakfast experiment I would try out this morning. If you have all the ingredients ready, it really doesn’t take long to make. If nothing is ready, add 5-10 minutes to your prep time depending on how quickly you wash, chop, measure and mix things.
My first try at the “quick weekday morning” version of the dish was pretty good. I have taken a few mental notes for next time – which will be the “weekend” version of it. I’ll list my changes at the end of this rough recipe. I’ll post pictures next time too as I made more of a scramble this time, not so much an omelet.

High protein breakfast omelet with chicken
- 2-3green scallions, chopped
- ½ tomato, chopped
- 4 oz cooked chicken breast, shredded
- 1 large egg
- 1 cup egg whites
- 1 oz cheddar cheese, shredded
- cumin (to your taste)
- chili powder (to your taste)
- onion powder (to your taste)
- paprika (to your taste)
- salt (to your taste)
- pepper (to your taste)

Step 1: Spray non-stick pan with a bit of PAM and heat it on medium heat. When ready, add scallions and cook for 1 minute, stirring occasionally so they don’t burn. Add tomatoes and cook for another minute. Add chicken breast and stir, warming it just a bit.
Step 2: While waiting for items in step 1 to cook, whisk together egg, egg whites, cheese and herbs/spices.
Step 3: When chicken has been heated through, add the egg and cheese mix. If you are looking for a scramble-style dish, start stirring the whole with a spatula. Cook until done.

Now, what would I change? I will be using a whole tomato next time, putting in 2 oz of cheese and adding a bit of chili sauce on top. Also, if you have the time, simply pour in the egg and cheese mixture, heat on the stove top a few minutes and then finish cooking the omelet by placing it in the stove to “bake”. My weekend version will be made like this. I’ll make sure to take a picture of that when I get around to making it.

Thursday, July 8, 2010

*cue 80s music* HEAT WAVE!!!!!! and pad thai!

Boy is it ever hot out there!!!! Since the weekend, the mercury has been steadily climbing and the humidity seems to only be getting worse daily. My hair is not very happy and neither is Pumpkin! The poor thing is barely meowing anymore and wants nothing more than to lie on the cold warm floor. I really do feel bad for her and it seems there isn't much we can do. We had to sleep with 2 fans in the bedroom with us last night and we never got cold (usually I need to cover myself with my small sheet by 3:30-4:30 but this never happened today). Yeah, it's hot and I get cranky when it's hot... I apologize to everyone in advance. Thankfully, I just heard that it should stop sometime this weekend. Woohoo rain!!!!!

Alright, so last week I made some Pad Thai. I figured it was time for me to make it again as it had been a long time since I had last made it and Salem and I needed a break from the normal chicken/fish/beef routine. The original recipe is from the Steven and Chris website. Please note though that I did make my own little changes (as always).

Yummy yummy pad thai!


Pad Thai 

Ingredients:
1/2 lb Firm tofu, drained
1/2 lb Shrimp, raw, de-veined (any size you like) **I had very large shrimp so I cut them into smaller pieces** 2 Eggs, extra-large, lightly beaten **I subbed one egg for 45ml egg whites**
3-4 cups Bean sprouts, rinsed and drained
2 Sweet peppers, chopped in a fine julienne
6 tbsp Safflower or corn oil **I eyeball it and try to get away with using less**
2 tbsp each, minced Garlic and minced Ginger
Sauce (mix together)
1/3 cup Tomato Ketchup
1/4 cup Asian Fish Sauce
1 1/2 tbsp Splenda
3 tbsp Water
1/2 lb Thai- or Chinese-style rice stick noodles (about linguine width) - softened in hot tap water for 15 - 20 minutes and drained
Garnish
3 tbsp Scallion greens, chopped on a bias
1/2 tsp Crushed red chillies
2 1/2 tbsp Cilantro, roughly chopped
4tbsp Peanuts, dry roasted & chopped
2 Limes, cut into six wedges
Hot sauce!!!

Now make it!!!
Wrap tofu in paper towels, place between two plates and weigh down with something heavy like a cast-iron skillet (or a big can of tomatoes). Let drain 20 minutes, unwrap and cut into a 1/4" dice. ** if you have the time, you can also take a bit of the sauce and marinate the tofu in it**
Heat wok or heavy skillet over a medium-low heat, as you assemble and organize your ingredients. Add 2 tbsp oil and turn heat to high. Once the wok is hot but not smoking, add tofu. Stir-fry about 3 minutes until golden and crispy. Remove with a slotted spoon and drain on a paper towel. Pour oil very carefully out of the pan and wipe it clean. Add 2 tbsp oil and cook the shrimp in the same manner, removing as soon as it has turned coral in colour **overcooking shrimp makes it rubbery**. Carefully pour out oil and clean pan before proceeding.
Re-heat the pan, add the last 2 tbsp oil and heat until hot. Add eggs, stirring to scramble over a medium-high heat. Add peppers, garlic and ginger and stir fry until fragrant -- about 10 seconds. Add the pre-mixed sauce and drained rice noodles. Toss over a medium-high heat, cooking about 3 - 4 minutes until noodles are tender and mixture is dry.
Add the bean sprouts, shrimp and tofu, and toss to mix. Serve on pre-warmed plates or bowl and let your lucky recipients customize their Pad Thai with favorite garnishes.

Tuesday, July 6, 2010

2 Lebanese-style breakfasts - a new weekend tradition?

Alright! So I wanted to post these earlier but I was very busy the last week (unpacking, work, obligations, cleaning, the beach and all manner of other things).

I was originally going to make a longer post but I think I shouldn't cram too many things in here. So here we go!

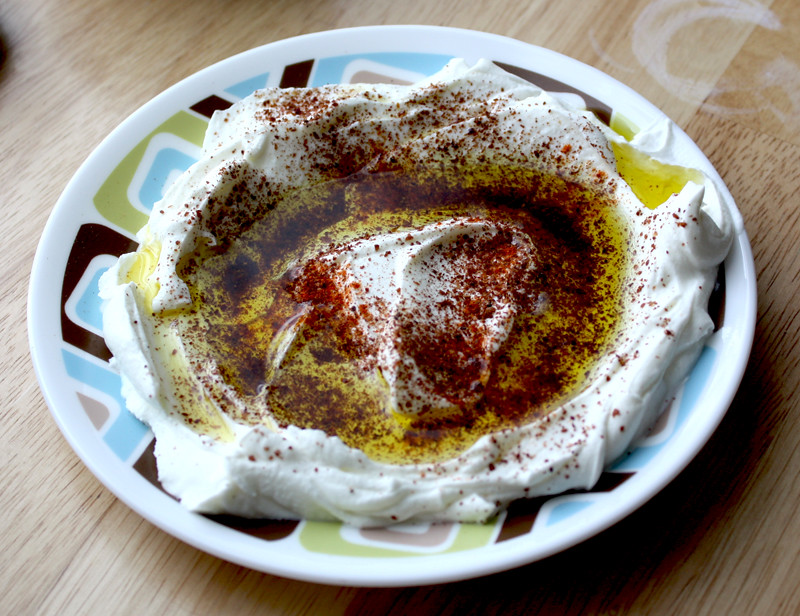
It seems Salem and I have developed a bit of a tradition for weekend mornings (one day every weekend). It's basically Lebanese breakfast time! For the last 2 weekends, we've been having "labneh" which, to me, seems like a halfway point between yogurt and cream cheese. You can find this in just about any grocery store in Ville St-Laurent (just go to the cheese/yogurt/olive counter). Otherwise, you might try other Middle-Eastern grocery stores. There are 2 kinds of labneh that I know of, but we tend to stick to the Phoenicia one.

MMMM Labneh!!!

Here's how I prepped mine (serves 2)
In a dessert plate, take about 3 Tbspns of labneh and spread, making a small circular depression (as if you had pushed a bagel into the labneh). Next, sprinkle with dried herbs and spices of your choice. One weekend, I used paprika, sumak (another spice to be found in Middle-Eastern stores), a bit of cayenne and some chili spice. Last Sunday, I used the same as above, but added zaatar which is a herb mix of thyme and sesame seeds (there are a few different kinds, everyone has their preference). Some people like to add salt but I don't as I really do not feel the need to have it added in at all. Drizzle olive oil on top (adjust amount to your preference) - that's where that little depression comes in handy.

You can eat this with pita (toasted or not) or with Manoush (we had manoush bi zaatar - manoush with zaatar in it) - we toasted ours.

And for you olive freaks out there, Salem says it's a great accompaniment. I'll have to take his word for it.

Yum, yum, yum!!!


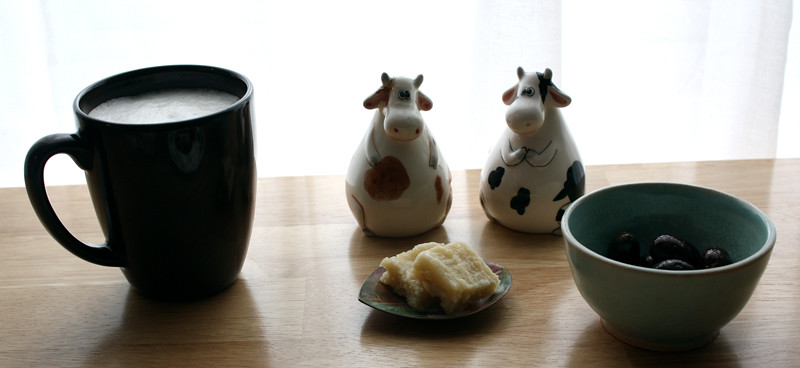
Lebanese breakfast 1: Coffee, olives, labneh and toasted pita. My little extra: almond (badam) burfi (an Indian sweet) pictured in between the coffee and the olives.


Lebanese breakfast 2: Coffee, olives, labneh and toasted manoush bi zaatar.


Manoush bi zaatar (purchased at Boulangerie Andalos, 264 boulevard Lebeau in Ville St-Laurent)

Coffee, badam (almond) burfi (see below for recipe) and olives.

Badam burfi (almonds)
Recipe thanks to Manjula's Kitchen

First, let me tell you just how much I love Manjula's Site! It's chock full of great Indian recipes. Also, she makes YouTube videos to show you just how to make these dishes. She looks like the sweetest lady ever and I wish I had a neighbour like her (although I'd be over there eating all the time and probably weigh about 300 lbs!). I highly suggest people check out her website, YouTube videos and maybe even give a few recipes a try. Mine have always turned out wonderfully!

Here's the recipe along with some of my personal notes.


Recipe makes 20 pieces.

Ingredients:
  • 1 cup whole almonds ***I buy almonds which already have the skins removed, therefore saving me some time and frustration
  • 1 cup sugar
  • Pinch of Cardamom powder ***After making this recipe twice, my taste buds demand that I add more      Cardamom powder - I love the stuff, what can I say?
  • 2 tablespoons butter or ghee (clear butter)
  • 1/3 cup milk
Method

  1. Soak the almonds in hot water for 30 minutes.
  2. Peel the skin off the almonds. Blend the almonds into a fine paste using just enough milk as needed to blend. *** I find this part horrendous if using my blender. I should remember to always use my little chopper/processor that came with my Cuisinart kit.
  3. Add the sugar and whip it for a couple of minutes.
  4. Heat the ghee in the frying pan on low-medium heat.
  5. As the ghee melts, add the almond paste and cook on medium heat, stirring continuously.
  6. Continue stirring until the mixture thickens to the consistency of bread batter, and starts leaving the sides of the pan.
  7. Add the cardamom powder. Remove the frying pan from the heat.
  8. Whip the batter using a spoon in a circular motion for about two to three minutes.
  9. Pour it into the prepared greased pan.
  10. Smoothen the surface of the mixture to about a quarter inch thick.  ***Often easier to do when you pray spatula with non-stick spray or ghee
  11. Let cool for about 20 minutes until burfi is just look warm.
  12. Cut into 1-inch squares or any shape you like.
  13. Cool to the room temperature and store burfi in an airtight container.
  14. Almond burfi has a long shelf life and can be kept outside for up to one week. When refrigerated, almond burfi will last a couple of months.
Suggestions:
You can make burfi using almond meal or almond flour. If you are using almond meal, mix one cup almond meal with the sugar and milk and knead the mixture for two minutes. Let the mixture sit for 10 to 15 minutes. Then follow the directions above. The almond flour burfi will be a little chewy.